WebTop groupware#
WebTop è un groupware completo che implementa Protocolli ActiveSync, CalDAV e CardDAV.
È possibile installare più istanze WebTop sullo stesso nodo dal Software center.
Configurazione#
WebTop ha bisogno di un host virtuale dedicato, un FQDN come webtop.nethserver.org.
Prima di procedere con la configurazione, assicurarsi di creare il relativo record all’interno del server DNS. Se hai intenzione di utilizzare un certificato Let’s Encrypt come predefinito, assicurati anche di avere un record DNS pubblico corrispondente.
Come configurare:
accedere alla pagina di configurazione dell’applicazione e inserire un FQDN valido all’interno del campo
Host virtuale WebTop (FQDN)abilitare
Richiedi certificato Let's Encryptcollegare l’istanza WebTop ad un
Mail serveresistenteselezionare la
Localizzazione predefinitae ilFuso orario predefinitocliccare sul pulsante Save
All’interno della sezione Avanzate, è inoltre possibile configurare:
la modalità debug
livelli di log
memoria minima e massima
PEC Bridge avvisare l’indirizzo (solo per le imprese)
Autenticazione#
Utilizzare sempre il formato completo del nome utente <utente>@<dominio> per accedere all’applicazione web e Active Sync.
Esempio
Nome del server: mymail.mightydomain.com
Dominio di posta alternativo: baddomain.net
Utente: goofy
Login: goofy@mightydomain.com
Nota
Il protocollo Active Sync è supportato solo su dispositivi Android e iOS. Outlook non è supportato.
Utente amministratore#
Dopo l’installazione, WebTop sarà accessibile utilizzando l’utente amministratore. L’utente amministratore può modificare le impostazioni globali e accedere come qualsiasi altro utente, tuttavia, non è un utente di sistema e non può accedere a qualsiasi altro servizio come Posta, Calendari, ecc.
Le credenziali di default sono:
Utente: admin
Password: admin
La password dell’utente dell’amministratore deve essere modificata dall’interfaccia di WebTop.
Avvertimento
Ricorda di cambiare la password di amministratore dopo l’installazione!
Per controllare la posta dell’account admin di sistema, utilizzare il seguente login: admin@<dominio> dove <dominio> è il TLD dell’FQDN.
Esempio
Nome del server: mymail.mightydomain.com
Utente: admin
Login: admin@mightydomain.com
Cambiare password di admin#
Accedere a WebTop utilizzando l’utente admin, quindi aprire le impostazioni dell’utente facendo clic sul menu  nell’angolo in alto a destra.
Andare in Impostazioni quindi fare clic su Cambia password.
Modifica del logo#
Per modificare e personalizzare il logo iniziale che appare nella pagina di login di WebTop, è necessario caricare il file immagine personalizzato sulle immagini pubbliche dell’utente amministratore e rinominarlo login.png.
Procedere come segue:
login con l’utente admin di WebTop
selezionare il servizio cloud e le immagini pubbliche:

caricare l’immagine (tramite il pulsante Carica in basso a sinistra o semplicemente trascinando con un drag & drop)
rename the loaded image so that its name is «login.svg» (use right click -> Rename):
il prossimo accesso mostrerà il nuovo logo nella pagina di login
Custom logos for light and dark color schemes#
It is possible to provide custom logos for both light and dark modes by uploading two different image files to the public cloud.
During the login process, the system looks for a custom login image using the following filename priority order:
login@{color-scheme}.svglogin@{color-scheme}.pnglogin@{color-scheme}.jpglogin.svglogin.jpglogin.png
Where {color-scheme} can be either light or dark.
Examples:
login@dark.svg
login@light.svg
If a color-scheme–specific image is not found, the system falls back to the
generic login.* filenames.
Gestione delle impostazioni utente#
La maggior parte delle impostazioni utente può essere gestita direttamente dall’utente stesso tramite il menu delle impostazioni. Le impostazioni bloccate richiedono privilegi amministrativi.
L’amministratore può impersonare utenti, per controllare gli account esistenti utilizzando credenziali di login speciali:
** Nome utente** :
admin!<username>Password:
<WebTop admin password>
Mentre si assume l’identità di un utente si ricevono gli stessi privilegi dell’utente, avendo la possibilità di controllare ciò che l’utente può vedere. La gestione completa delle impostazioni dell’utente è disponibile direttamente nell’interfaccia di amministrazione, cliccando con il pulsante destro del mouse su un utente: il menu impostazioni aprirà il pannello delle impostazioni complete dell’utente, con tutte le opzioni sbloccate.
È inoltre possibile modificare l’email di tutti gli utenti selezionati:
selezionare gli utenti (Click + CTRL per la selezione multipla)
cliccare con il pulsante destro del mouse su Aggiorna il dominio email
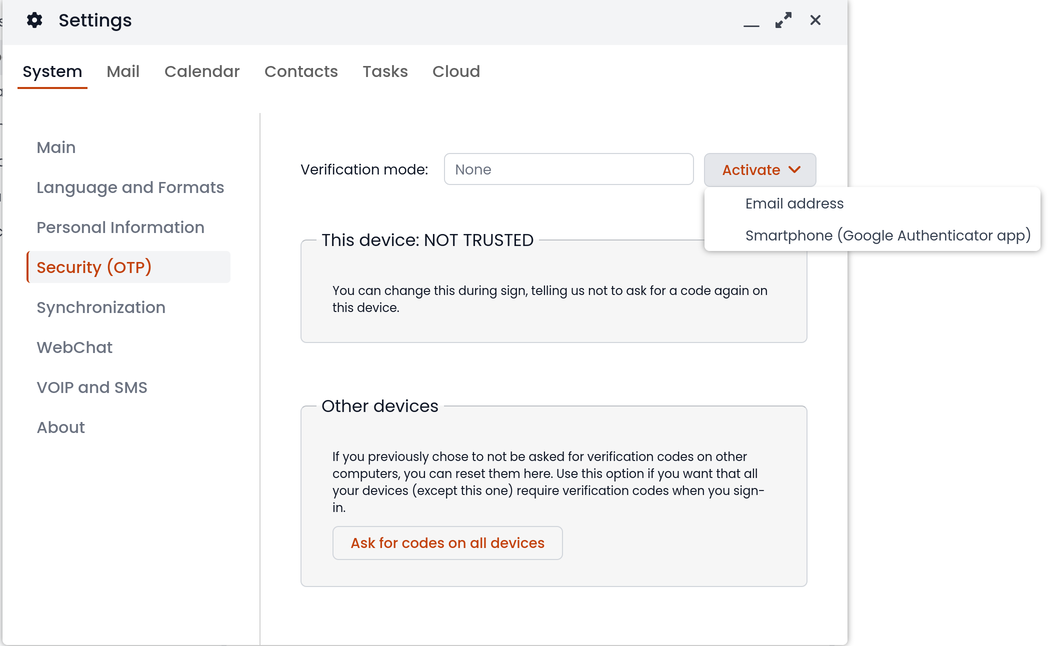
Autenticazione a due fattori (2FA)#
WebTop supporta two factor Authentication. L’utente può scegliere tra:
Per abilitare 2FA:
cliccare sul pulsante del menù in alto a destra e selezionare l’icona Impostazioni
quindi selezionare Sicurezza (OTP) e fare clic sul pulsante Attiva
Sincronizzazione ActiveSync (EAS)#
I dispositivi mobili possono essere sincronizzati con ActiveSync. Active Sync può essere utilizzato solo per contatti e calendari.
Apple iOS#
Accedi al tuo iOS device, naviga su Impostazioni e aggiungi un account Exchange seguendo la guida ufficiale.
Compila i campi richiesti con:
E-mail: aggiungi il tuo indirizzo email, ad esempio: goofy@nethserver.org
Server: aggiungi il nome pubblico del tuo server, ad esempio: mail.nethserver.org
Domain: lasciare vuoto
** Nome utente** : inserisci il tuo nome utente completo di dominio, ad esempio: goofy@nethserver.org
Password: inserire la password
Nota
i dispositivi iOS richiedono un certificato SSL valido sul server. Vedi Certificati TLS
Google Android#
Accedi al tuo Android device, naviga nelle Impostazioni, quindi seleziona Aggiungi account -> Exchange (o Aziendale per le versioni precedenti).
Compila i campi richiesti con:
** Nome utente** : inserisci il tuo nome utente completo di dominio, ad esempio: goofy@nethserver.org
Password: inserire la password
Quindi selezionare Configurazione manuale e modificare il nome del campo Server con il nome pubblico del server. Infine, se hai un certificato autofirmato sul tuo server, assicurati di selezionare l’opzione SSL/TLS (accetta tutti i certificati).
Nota
Su alcune versioni Android (in particolare Samsung), il nome utente e il dominio devono essere inseriti nella stessa riga. In questo caso, lasciare vuoto il campo prima del carattere backslash \, e inserire il nome utente nel seguente formato: \goofy@nethserver.org
Calendario e contatti multipli#
I calendari e i contatti condivisi possono essere sincronizzati utilizzando il protocollo ActiveSync.
Le risorse condivise vengono visualizzate con il nome e la categoria del proprietario. Il numero tra parentesi quadrate è l’ID interno. Gli eventi privati non sono sincronizzati.
Dispositivi mobili basati su Apple iOS supportano completamente cartelle/categorie per calendari, contatti e attività (chiamati promemoria), compresi i colori originali.
I dispositivi mobili basati sul Android supportano solo calendari e contatti, le attività non sono supportate. Utilizzando l’applicazione Google Calendar tutti gli elementi avranno lo stesso colore.
Installazione e utilizzo dell’applicazione CloudCal, è possibile modificare i colori associati a ciascun calendario, compresi quelli condivisi.
Su dispositivi Android, i contatti da rubriche condivise vengono uniti con la rubrica personale e visualizzati in una sola vista. I contatti possono essere modificati e le modifiche verranno salvate nella sorgente originale.
Nota
In order to receive data via EAS on mobile devices, shared resources (Calendars and Contacts) should have synchronization enabled (Active or Read-only):
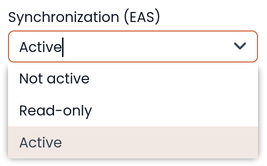
È possibile attivare o disattivare la sincronizzazione per ogni risorsa condivisa.
Per farlo, basta cliccare con il pulsante destro del mouse sulla risorsa condivisa :
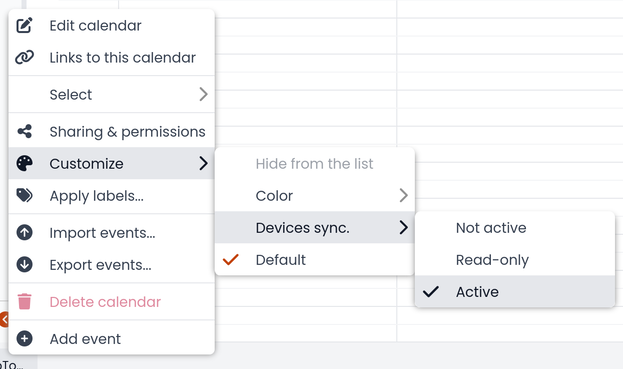
L’impostazione predefinita è Non attivo.
Sincronizzazione CalDAV e CardDAV#
I calendari e le rubriche possono essere sincronizzate anche attraverso i protocolli CalDAV e CardDAV.
Per sincronizzare un calendario, selezionare il link URL facendo clic con il tasto destro del mouse sul calendario e selezionando Collegamenti al calendario, quindi utilizzarlo per configurare il client di terze parti.
Per sincronizzare una rubrica, selezionare il link URL` facendo clic con il pulsante destro del mouse sulla rubrica e selezionando Collegamenti alla rubrica, quindi usarlo per configurare il client di terze parti.
Per autenticare, fornire le credenziali nel seguente modulo:
** Nome utente** : inserisci il tuo nome utente completo di dominio (es: goofy@nethserver.org)
Password: inserire la password
Alcuni client di terze parti permettono di semplificare la configurazione tramite la funzione auto-discovery che scopre automaticamente le risorse sincronizzabili, come nel caso dei dispositivi mobili (ad esempio dispositivi Android o iOS).
Nota
Se si utilizzano client che non supportano l’auto-discovery, è necessario utilizzare l’URL completo: https://<server_name>/webtop-dav/server.php
Se si utilizzano client che supportano l’auto-discovery utilizzare l’URL: https://<server_name>
Google Android#
A good Android third-party client is DAVx5.
aggiungere un nuovo account cliccando sul + e selezionare Login con URL e username
inserire
URL(https://<server_name>), nome utente completo (es: goofy@nethserver.org) e passwordclicca sul nuovo profilo e seleziona le risorse che vuoi sincronizzare
Apple iOS#
Il supporto CalDAV/CardDAV è integrato e nativo su iOS, quindi per configurarlo:
andare su Impostazioni -> Account e Password - > Aggiungi account
selezionare Altro -> Aggiungi CalDAV o CardDAV account
inserire il nome del server (es: server.nethserver.org), il nome utente completo (es: goofy@nethserver.org) e la password
Client desktop#
Thunderbird
Thunderbird include già il supporto per i calendari CalDAV. Per sincronizzare i contatti con CardDAV è necessario un add-on di terze parti come Cardbook .
Outlook
Il plugin Open Source CalDAV Synchronizer per Outlook supporta sia CardDAV che CalDAV.
Avvertimento
WebTop is a client-less groupware: its functionalities are fully available only using the web interface!
L’uso di CalDAV/CardDAV attraverso clienti di terze parti non può essere considerato un’alternativa all’interfaccia web.
Automatic configuration of email clients#
The Autodiscover and Autoconfig protocols allow email clients to automatically discover mail server settings, such as incoming and outgoing mail server addresses, ports, and authentication methods. This simplifies the configuration process for end users, as they do not need to manually enter server settings.
The Autodiscover and Autoconfig protocols are not supported by all email clients. For example, iOS devices do not support them, while clients like Thunderbird and Microsoft Outlook on Windows and Linux desktops, as well as Android devices, do support them. Some clients may still require manual configuration of server settings.
To enable automatic email client configuration, some DNS records and HTTP
routes must be configured for the WebTop mail domain (e.g.
example.org).
A records#
The A-type records are used by email clients to establish TLS connections, therefore their names must be associated with a valid TLS certificate.
mail.example.org,imap.example.org,smtp.example.orgmust point to the public static IP of the mail serverautodiscover.example.org,autoconfig.example.orgmust point to the public static IP of the server hosting WebTop.
HTTP routes#
To ensure that Autodiscover and Autoconfig requests are directed to the correct WebTop instance,
you need to set up an HTTP route to the WebTop server. Navigate to Settings → HTTP routes
from the proxy page. This configuration is necessary for A-type DNS records like
autodiscover.example.org and autoconfig.example.org to be properly managed by the WebTop application.
Configure the HTTP route with the following parameters for both Autodiscover and Autoconfig:
Name:
autodiscover_webtopandautoconfig_webtopNode: Select the node where your WebTop instance is running
URL: Copy the URL, including its specific port number, from the automatically generated WebTop HTTP route details (e.g. http://127.0.0.1:20001)
Host:
autodiscover.example.organdautoconfig.example.orgRequest Let’s Encrypt certificate: Enable this option if you wish to use a Let’s Encrypt certificate (optional)
MX record#
An MX-type record is also a Mail application requirement, as explained in
Impostazioni generali. For the MX record of example.org
Autodiscover prefers a name like mail.example.org.
SRV record#
This enables clients to locate the Autodiscover service using a SRV-type record.
Name:
_autodiscover._tcp.example.orgType:
SRVService:
_autodiscoverProtocol:
_tcpTTL:
3600Priority:
10Weight:
10Port:
443Target:
autodiscover.example.org– the DNS A record pointing to the WebTop server.
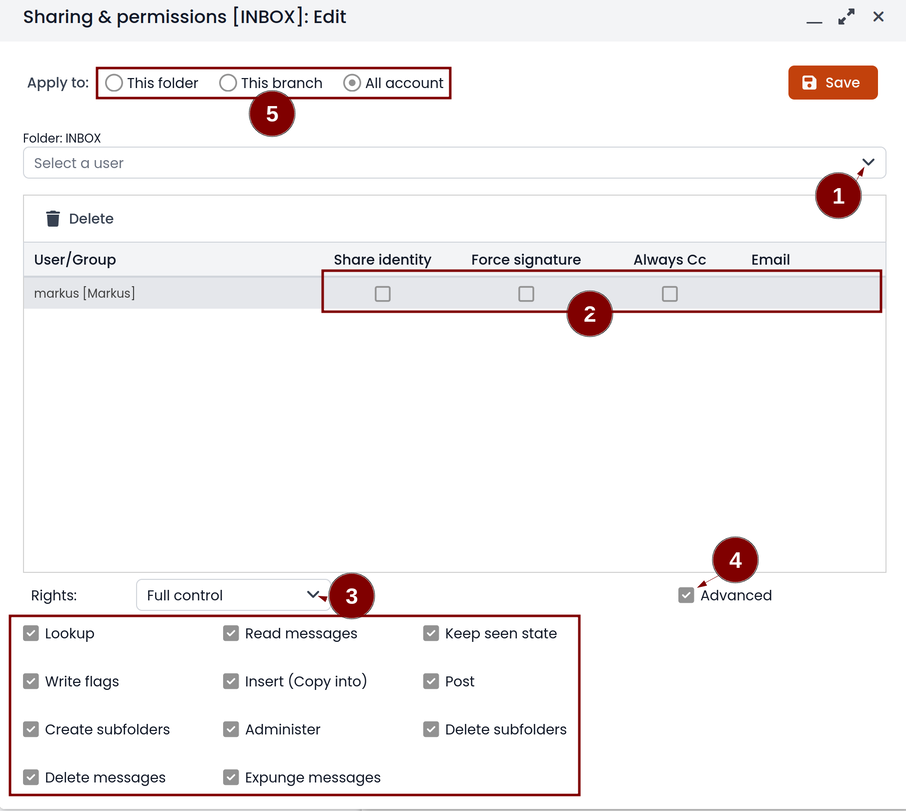
Condivisione e-mail#
È possibile condividere una singola cartella o l’intero account con tutte le sottocartelle. Selezionare la cartella da condividere -> click destro -> Gestisci condivisione:

selezionare l’utente per condividere la risorsa (1)
selezionare se si desidera condividere la propria identità con l’utente e anche forzare la firma (2)
scegliere il livello di autorizzazioni associate a questa quota (3)
se è necessario modificare ulteriormente le autorizzazioni, selezionare
Avanzate(4)infine, scegliere se applicare la condivisione solo alla cartella da cui hai iniziato, o solo al ramo delle sottocartelle o all’intero account (5)
Nota
L’opzione: Forza firma può essere utilizzata solo se la firma è stata associata all’indirizzo di posta.
Condivisione calendari e contatti#
Condivisione Calendari#
Puoi condividere ogni calendario personale singolarmente. Selezionare il calendario da condividere -> click destro -> Condivisione e permessi:

Selezionare l’utente destinatario della condivisione (o Gruppo) e abilitare le autorizzazioni sia per la cartella che per i singoli elementi:

Etichette personalizzate#
È possibile aggiungere una o più etichette nelle e-mail, in un evento di calendario o un’attività.
Ci sono due tipi di etichette:
Private: non utilizzabile per campi personalizzati e non visibile ad altri utenti
Shared: utilizzabile per pannelli di campi personalizzati e visibile ad altri utenti
L’utente può normalmente gestire solo etichette private. Per gestire le etichette condivise è necessario abilitare una specifica autorizzazione tramite il pannello di amministrazione:
andare nel menù Amministrazione, quindi selezionare Domini - > NethServer -> Gruppi - > Utenti - > Authorizzazioni
aggiungere (+) -> Servizio -> com.sonicle.webtop.core (WebTop) -> Contesto -> TAGS -> Azione -> MANAGE
cliccare OK poi Salve e chiudi
È possibile gestire le etichette tramite il pulsante  nell’angolo in alto a destra.
La stessa funzionalità può essere raggiunta anche dai singoli moduli facendo clic con il tasto destro -> :guilabel: Etichette -> Gestisci etichette.
La visibilità può essere impostata solo durante la creazione di etichette. Per modificare la visibilità dell’etichetta è necessario eliminare l’etichetta e crearla di nuovo.
Le etichette create possono essere utilizzate in qualsiasi altro modulo come Posta, Rubrica, Calendario e Attività.
Campi personalizzati#
Con i campi personalizzati, è possibile fornire informazioni e dati aggiuntivi per ogni contatto, evento o attività.
Custom fields are only available for the Address Book, Calendar, and Tasks modules and are specific to each different module.
In order to manage custom fields and their panels, the user must have a specific authorization, obtained through the administration panel:
andare nel menù Amministrazione, quindi selezionare Domini - > NethServer -> Gruppi - > Utenti - > Authorizzazioni
add (+) -> Services -> com.sonicle.webtop.core (WebTop) -> Resource -> CUSTOM_FIELDS -> Action -> MANAGE
click OK then save and exit
Users who have this authorization will find the specific button available at the top right:

To create a new custom field it is necessary to fill in at least the Name field and select the Type:

For the Name field only alphanumeric characters (including - and _) are allowed. Spaces are not allowed.
The Description field is used to add details to the field and the Label field represents the label that will be shown along
with the field.
For each field it is possible to enable two options:
Show in search bar: the field is added in the multiple search window (a new access will be required)
Show in preview: the field is shown in the preview window of a contact
Additional specific properties, that are also customizable, are available for each type.
For the List box type it is necessary to fill in the values to be selected:

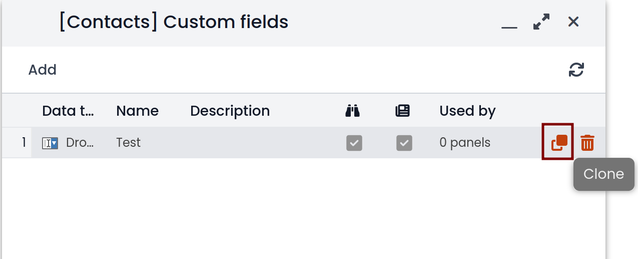
Using the Clone button you can copy the custom field to create similar ones:
Nota
With the FREE version, installed by default, it is possible to create up to a maximum of 3 custom fields for each different module (3 in Address Book + 3 in Calendar + 3 in Activities). To remove this limit it is necessary to upgrade to the PREMIUM version by purchasing a dedicated license on Nethesis shop
Searches on custom fields#
One of the best functionalities of custom fields is the possibility to perform multiple searches on all modules and fields for which the option Show in search bar has been activated.
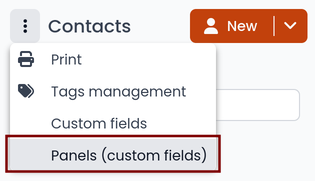
Custom panels#
Custom panels display the Campi personalizzati and associated them with resources.
Users with the authorization to manage custom fields can access the configuration panel using the button at the top right:
When creating a new panel it is mandatory to indicate the Name that will appear in the resource. You can also insert a Description and a Title.
Using shared labels, you can easily assign panels to specific resource categories. A panel without an associated label will be visible for every available resource: all contacts, all events or all activities.
Use the Add button to add a custom field inside the panel.
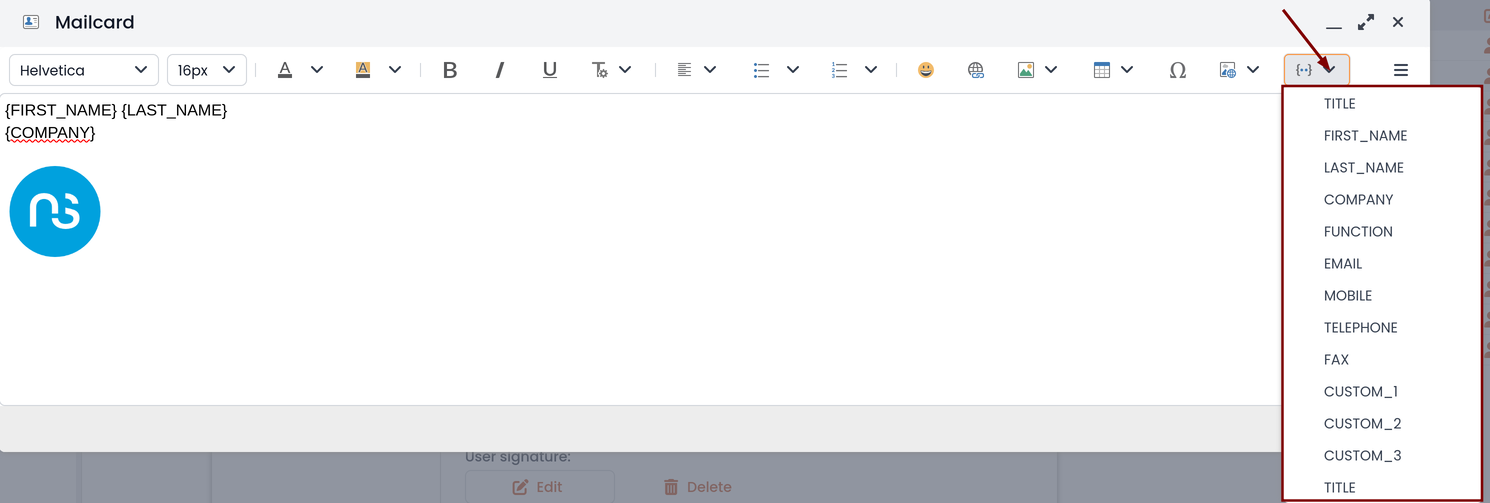
Mailcards#
One of the main features of managing signatures on WebTop is the opportunity to integrate images or custom fields profiled per user.
To use the images you need to upload them to the public cloud through the WebTop admin user like this:
You can use the Upload button to load an image which is at the bottom or simply via drag & drop.
Nota
Remember that the public images inserted in the signature are actually connected with a public link. To be visible to email recipients, the server must be reachable remotely on port 80 (http) and its FQDN name must be publicly resolvable.
Alternatively, you can configure a global setting to turn images automatically into inline attachments instead of public internet links.
It is possible to do this from web interface by accessing the administration panel -> Properties (system) -> Add -> select com.sonicle.webtop.mail (Mail) and enter the data in the Key and Value fields according to the key to be configured:
public.resource.links.as.inline.attachments = true (default = false)
To change the signature, each user can access the :

You can use the uploaded image inside the mailcard with this button:

Nota
The personal mailcard can be associated with the user or the mail address. Users with access to the mail address will also be able to use the mailcard.
By accessing the user settings from the WebTop administration panel ( ) it is also possible to set up a general domain mailcard that will be automatically set for all users who have not configured their personal mailcard:

Furthermore, it will also be possible to modify personal details:

that can be used within the template-based fields within the domain mailcard editor:
In this way it is possible to create a single mailcard that will be automatically customized for every user who does not use his own mailcard.
Multiple mailcards#
It is possible to configure multiple mailcards (HTML signatures) for each user.
Access the and create multiple identities:

To edit every single signature select then select each individual signature and click on the edit mailcard button


to use multiple mailcards, create a new email, and choose the signature:

Mail inline preview#
By default, the mail page will display a preview of the content of the latest received messages.
This feature can be enabled or disabled from the Settings menu, under the Mail tab, the check box is named Show quick preview on message row.
Mail archiving#
Archiving is useful for keeping your inbox folder organized by manually moving messages.
Nota
Mail archiving is not a backup.
The system automatically creates a new special Archives folder
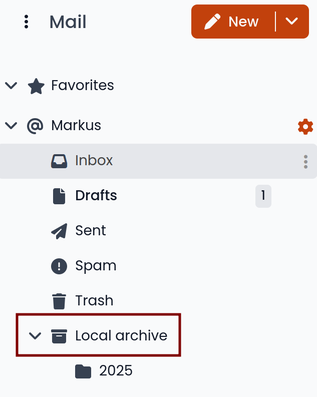
If the Archives folder does not appear immediately upon login, it will appear at the first archiving.
There are three archiving criteria:
Single folder: a single root for all archived emails
Per year: a root for each year
By year / month: a root for each year and month

To maintain the original structure of the folders it is possible to activate Keep folders structure

The archiving operation is accessible from the contextual menu (right-click). Click on Archive

The system will process archiving according to the last settings chosen.
IMAP folders subscription#
By default, all IMAP folders on the server are automatically subscribed and therefore visible since the first login.
If you want to hide some folders from the view, which is equivalent to removing the subscription, you can simply right-click on the folder to hide and select from the interactive menu the item Hide from list.
For example, if you want to hide the subfolder folder1 from this list, just right-click on it and select Hide from list:

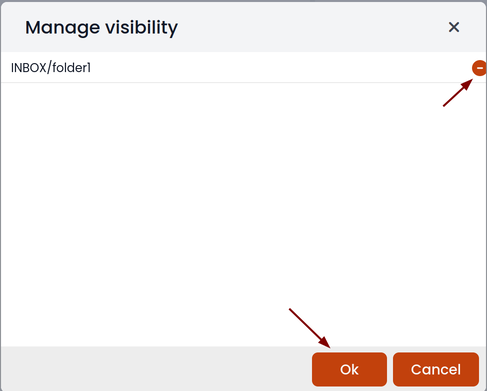
It is possible to manage the visibility of hidden folders by selecting the Manage visibility function:

For example, if you want to restore the subscription of the folder1 just hidden, just select it from the list of hidden folders and click on the icon on the left:
Customize proactive security on emails#
The Proactive Security module (PAS) warns the end user of possible security risks and suspicious senders inside the emails. The user will also be warned when trying to open potentially dangerous attachments or links contained in emails.
The PAS function allows some customization both for the end user and the WebTop admin.
For the end user it is possible to mark a sender as trusted when it is recognized as such by the yellow shield. To do so, it is possible to click directly on the shield or right click on the sender and select the Mark as trusted entry.
Nota
This type of customization is only valid for the user that performed the action. It is possible to mark a sender as trusted only if the shield is yellow.
The admin user can disable all or some of the rules that are part of the PAS (ProActive Security), both for single users and groups.
To do so, it is necessary to add a specific authorization (to the single user or the group of users) for the Service com.sonicle.webtop.mail (Mail) and for the PRO_ACTIVE_SECURITY resource:

Below is an explanation of every single entry available as Action :
DISABLED: completely disables PASNO_LINK_DOMAIN_CHECK: do not check domains different from the sender’s domainNO_MY_DOMAIN_CHECK: do not verify if the sender’s domain is in my domainNO_FREQUENT_CONTACT_CHECK: do not check if the sender is in my contacts which are saved automaticallyNO_ANY_CONTACTS_CHECK: do not check if the sender is among one of my contactsNO_FAKE_PATTERNS_CHECK: do not verify the presence of false patterns in the sender (e.g. email address of the name shown is different from the sender’s email address)NO_UNSUBSCRIBE_DIRECTIVES_CHECK: do not check the entry for the unsubscribe directives to the mailing list (only if the spam status is green)NO_DISPLAYNAME_CHECK: do not compare the contact’s display name with the contact in my address book with the same emailNO_SPAM_SCORE_VISUALIZATION: do not show/check the spam score displayed in the message headerNO_LINK_CLICK_PROMPT: do not check the click action on linksNO_ZIP_CHECK: do not give warning about zip attachments
This way it is possible to customize and create special profiles for some users who might not want all the actions to be active.
The administrator can also choose the list of file extensions for attachments which are considered a threat.
As default, these are the extensions that are considered dangerous: exe,bat,dll,com,cmd,bin,cab,js,jar
To modify this list it is necessary to add this global setting:
Service =
com.sonicle.webtop.mailKey =
pas.dangerous.extensions
For example, if you wanted to add the HTML extension among those that are considered dangerous, the value field should contain the following:
Value =
exe,bat,dll,com,cmd,bin,cab,js,jar,html(Values always need to be separated by a comma)
Export events (CSV)#
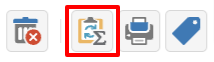
To export calendars events in CSV (Comma Separated Value) format, click on the button in the top right corner and select ERP export (CSV)
Finally, select a time interval and click on Next to export into a CSV file.
Tasks#
Quick view filters#
In the toolbar above the grid there are 7 buttons that allow you to select the most suitable quick view. The first two buttons refer to today’s activities or to those planned within the next 7 days:

Today: shows unfinished tasks without a start date or with a start date up to today (inclusive) and those completed with an end date up to today (inclusive)
Next 7 days: shows uncompleted tasks with no start date or starting up to 7 days from today and completed tasks with completion date up to now (inclusive)
The remaining 5 buttons allow you to obtain these other types of quick views:

Not started: shows only activities with status «To be started» and starting today (inclusive)
Late: shows only uncompleted tasks with start date up to today (inclusive) and completion date previous to the current one
Completed: shows all activities with status completed and with any date range
Not completed: shows all activities with status other than completed and start date within 1 year (for recurring tasks, only the first instance of the series still to be completed is shown)
All: shows all activities in any status (for recurring tasks the series icon main is shown)
Recurring tasks#
It is possible to configure any type of recurrence:
Editing a recurring activity can be done in two different ways:
on the individual task by opening it with a double click from a view other than All In this case the task will be removed from the recurrence and its icon will become this one:

on the entire series with a double click from the All view or by using the following button on the single task already open:
Sub-tasks#
On any task it is always possible to add related sub-tasks (one Master/Slave level only) simply by using the right button and selecting Add sub-task Within the connected tasks, both in the master and in the slave, a link is available at the bottom right to open the related tasks:

It is possible to Move or Copy this type of activity (right click -> Move/Copy) by choosing to copy or move the sub-activities through an option active by default.
Multiple searches#
In the bar at the top there is a quick search that is executed on all fields. You can also narrow the search by filling multiple search fields.

Nextcloud integration#
Before proceeding, verify that the Nextcloud module has been installed from the Software center.
By default, Nextcloud integration is disabled for all users. To enable it, use the administration panel which can be accessed using the webtop admin password
If you want to enable the service for all users, proceed as follows:
access the administrative panel and select Groups:

modify the properties of the «users» group by double-clicking and selecting the button related to the Authorizations:

add to existing authorizations those related to both the
STORE_CLOUDandSTORE_OTHERresources by selecting the items as shown below:


to get this:

save and close.
Fron now on, any user it will be able to insert the Nextcloud resource (local or remote) in the personal Cloud.
To do this, simply select the Cloud button and add a new Nextcloud resource by right-clicking on My resources and then Add resource in this way:

A pre-filled wizard will open:

Nota
Remember to fill in the User name and Password fields related to access to the Nextcloud resource, otherwise it will not be possible to use the public link to the shared files
Nota
The Path must be changed from /nextcloud/remote.php/webdav to /remote.php/webdav. Also make sure to enter the Nextcloud FQDN inside the Host (eg. nextcloud.mydomain.com).
Proceed with the Next button until the Wizard is complete.
Personal Cloud#
The personal Cloud module allows you to send and receive documents via web links.
How to create a link to send a document#
To create the link, select the button at the top right:

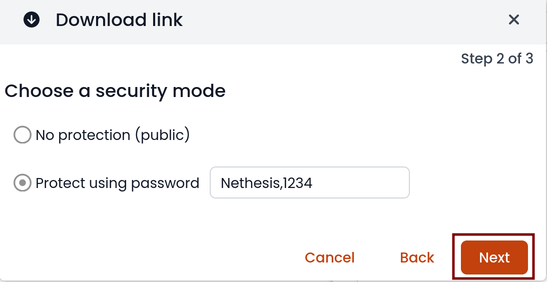
Follow the wizard to generate the link, use the field date to set the deadline.

you can create a password to protect it:
The link will be generated and will be inserted in the new mail:
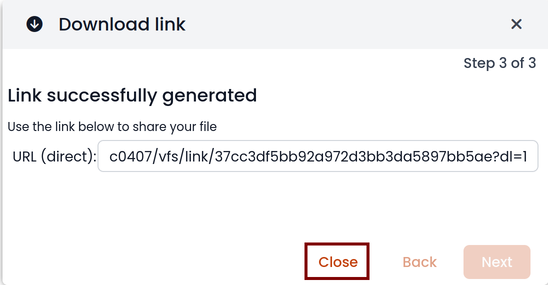

Downloading the file generates a notification to the sender:

Request for a document#
To create the request, insert the subject of the email then select the button at the top right:

Follow the wizard. You can set both an expiration date and a password. The link will be automatically inserted into the message:

A request email will be sent to upload the document to the Cloud:

The sender will receive a notification for each file that will be uploaded:

To download the files just access your personal with date and name:

Chat integration#
Web chat integration installation is disabled by default for all users.
To enable chat integration:
Installare l’applicazione «Ejabberd» dal ``Software center` `` pagina Vedere Install applications e Ejabberd.
In Ejabberd
Settingspage, the fieldEjabberd domain (FQDN)must match the value ofMail domainin WebTop’s settings.Access WebTop as admin user then enable the web chat authorization:
Access the Administration menu, then
Click OK then save and close
Jitsi integration#
With this integration it is possible to start a new video conference and send the invitation via email, or schedule one by creating the event directly from the calendar. To activate the integration it is necessary to configure the Jitsi instance that you would like to use directly from admin panel by modifying the documented global settings
By default, the videoconferencing service is disabled for all users. To enable it, for all users it is necessary to add a specific authorization from the administration panel:
Access the Administration menu, then
Click OK then save and close
The conference will be available for the users after a new login.
To create a new video conference meeting, you can start from these two buttons:
(top left)

(top right)

It is also possible to do this from a new email window or a new calendar event.
For each new meeting you have to decide whether it should start immediately (instant meeting) or if it should be scheduled by invitation.
There are several ways to share the new meeting link:

Start now allows you to immediately access the newly created meeting room and copy the link via the button available next to the URL
Send invitation -> Copy meeting invite: in this case an invitation message, which also includes the meeting link, will be copied (e.g: To join the meeting on Jitsi Meet, click this link: …)
Send invitation -> Share by email: you will be asked if you would like to change the subject and date of the meeting, which will then be inserted in the newly generated email:

Send invitation -> Plan event: also in this case you will be asked if you would like to change the subject and date/time of the meeting before creating the calendar event that will allow you to invite other participants.
If an event contains a link to a third-party video conference, the buttons that will allow you to access the meeting directly:

Third-party video calls#
The video conferencing services that are currently supported, in addition to Jitsi, are: Google Meet, MS Teams and Zoom. It is possible to add additional platforms through a global setting.
SMS integration#
It is possible to send SMS (Short Message Service) messages to a contact that has the mobile number in the address book. To activate sending SMS, first you need to choose one of the two supported providers: smshosting or twilio.
Once registered to the service of the chosen provider, retrieve the API keys (AUTH_KEY and AUTH_SECRET) to be inserted in the WebTop configuration db.
The settings to configure are those shown here .
You can do it by accessing the administration panel -> Properties (system) -> Add -> select com.sonicle.webtop.core (WebTop) and enter the data in the Key and Value fields according to the key to be configured:
sms.provider = smshosting or twilio
sms.provider.webrest.user = API AUTH_KEY
sms.provider.webrest.password = API AUTH_SECRET
sms.sender = (default optional)
The sms.sender key is optional and is used to specify the default sender when sending SMS.
It is possible to indicate a number (max 16 characters) or a text (max 11 characters).
Nota
Each user can overwrite the sender by customizing it as desired through its settings panel: WebTop -> Switchboard VOIP and SMS -> SMS Hosting service configured -> Default sender
To send an SMS from the address book, right-click on a contact that has the mobile field filled in -> Send SMS
Launcher customization#
The launcher is the icon-based menu on the left of the page. You can add custom buttons to the launcher.
To configure the buttons, access the WebTop administration panel and select -> Domains -> NethServer -> Launcher :

For each button, enter these three values
Name: tab descriptive text that appears with mouse-overLink URL: URL to be opened in a new browserIcon URL: icon image URL, it should always be a publicly reachable address. To avoid scaling problems, use vector images
If you can’t find a public URL for the icon image, you can upload the icon on WebTop public cloud.
WebTop public cloud already hosts mailcards images.
Access the administrator panel and click on Cloud -> Public Images,
then insert a URL like https://<public_name_server>/webtop/resources/156c0407/images/<icon.svg>.
The configured custom link buttons will be shown to all users at the next login.
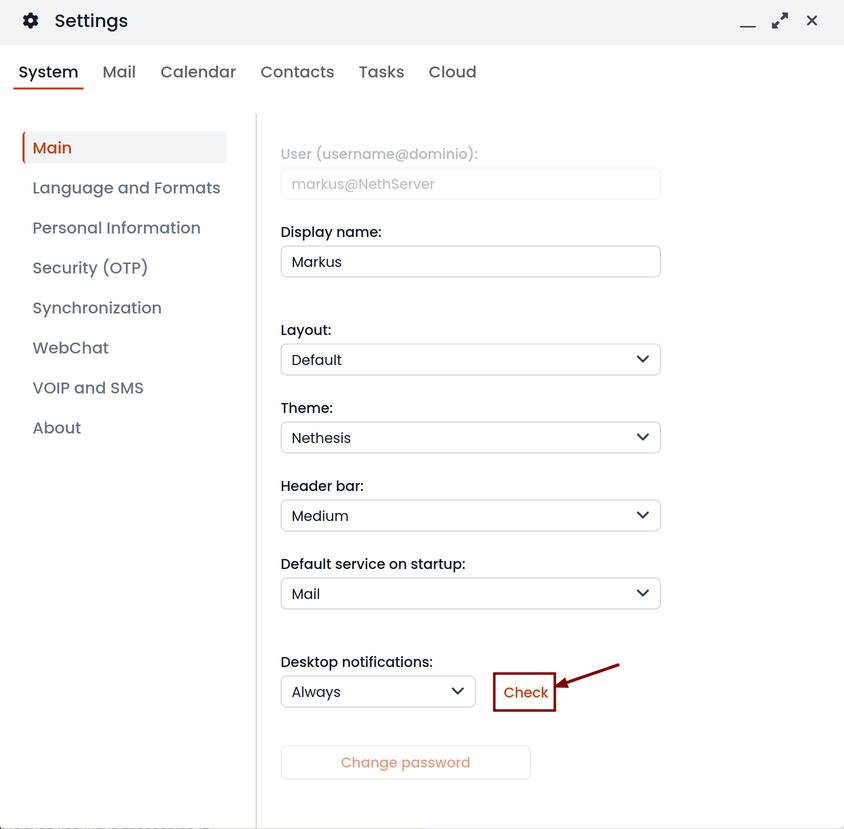
Browser notifications#
WebTop can notify new mail messages and upcoming calendar events.
To activate it, simply access the general settings of your user:

It is possible to enable desktop notifications in two modes:
Always: notifications will always be shown, even with the browser open
Auto (in background only): notifications will be shown only when the browser is in the background
Make sure to allow notifications inside your browser.
If you need to enable this consent later on a different browser just click on the appropriate button:
External IMAP accounts (Beta)#
External IMAP accounts can be accessed in read-only mode. Each user can have a maximum of 3 external accounts.
To enable the feature:
Access the administration panel, then selected Properties (system)
Click on Add button and select com.sonicle.webtop.mail
Create a new key named
external-account.enabledwith valuetrueGive a specific authorization to the user by setting:
Service:
com.sonicle.webtop-mailResource:
EXTERNAL_ACCOUNT_SETTINGSAction:
CHANGE
Users can now configure personal external accounts by accessing the Settings section.
Subscribing remote resources#
WebTop supports subscriptions to remote calendars and contacts (directory) using CardDAV, CalDAV and iCal.
Remote calendars#
An Internet Calendar can be added and synchronized. To do so just click the right button on personal calendars, Add Internet Calendar. Two types of remote calendars are supported: WebCal (ICS format) and CalDAV.
Nota
Synchronization of Webcal calendars (ICS) is always done by downloading every event on the remote resource every time, while only the differences are synchronized with the CalDAV mode
Example of Google Cal remote calendar (Webcal only - ICS)#
Take the public access ICS link from your Google calendar: Calendar options -> Settings and sharing -> Secret address in iCal format
On WebTop, add an Internet calendar of type Webcal and paste the copied URL without entering the authentication credentials in step 1 of the wizard.
The wizard will connect to the calendar, giving the possibility to change the name and color, and then perform the first synchronization.
Nota
The first synchronization may fail due to Google’s security settings. If you receive a notification that warns you about accessing your resources you need to allow them to be used confirming that it is a legitimate attempt.
Remote contacts (directory)#
Google CardDAV remote address book#
Steps:
on WebTop, configure a new Internet address book, right-click on Personal Categories -> Add Internet address book and and enter a URL of this type in step 1 of the wizard:
https://www.googleapis.com/carddav/v1/principals/XXXXXXXXXX@gmail.XXX/lists/default/Replace theXwith your GMail accountenter the authentication credentials (as user name use the full address of gmail):
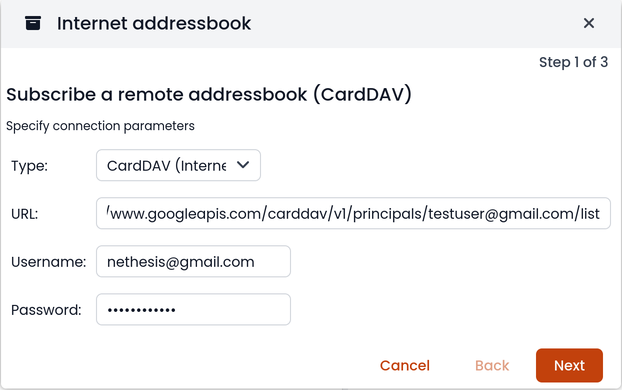
the wizard in the following steps will connect to the phonebook, giving the possibility to change the name and color, and then perform the first synchronization
You must enable the synchronization into your Google account and enable access for App Password.
Synchronization of remote resources can be performed manually or automatically.
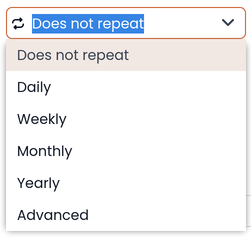
Automatic synchronization#
To synchronize automatically you can choose between three time intervals: 15, 30 and 60 minutes. The choice of the time interval can be made in the creation phase or later by changing the options. To do this, right-click on the phonebook (or on the calendar), Edit Category, Internet Addressbook (or Internet Calendar):

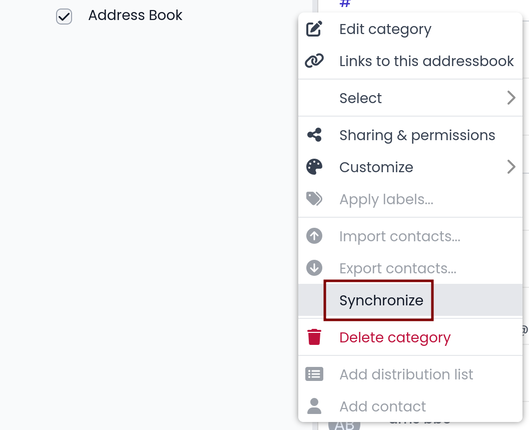
Sincronizzazione manuale#
Per aggiornare una rubrica remota, ad esempio, fare clic su di essa con il pulsante destro del mouse e quindi selezionare «Sincronizza»:
Per le rubriche CardDAV, così come per i calendari di CalDAV remoti, è possibile selezionare se eseguire una sincronizzazione completa o solo per le modifiche. Per fare questo, fare clic con il pulsante destro del mouse sulla rubrica (o sul calendario), Modifica categoria:

Selezionare la modalità desiderata accanto al pulsante di sincronizzazione:

Accesso utente e log di sessione utenti#
La tabella che mostra l’intero registro di accessi e sessioni per ogni utente è disponibile sotto il pannello di amministratore. Accedere al menu: Amministrazione, poi Domini –> NethServer –> Audit (dominio) –> Log accessi.
Per ogni accesso, la tabella riporta i seguenti dati nelle colonne: ID sessione, nome utente, data e ora, durata della sessione, stato di autenticazione ed eventuali errori di login.
È possibile abilitare la geolocalizzazione IP pubblica. In primo luogo, è necessario registrare un account su ipstack e ottenere la API KEY da inserire nel db di configurazione.
Login to the administration panel -> Properties (system) -> add -> com.sonicle.webtop.core (WebTop) -> enter the following data in the fields Key e Value :
geolocation.provider=ipstackgeolocation.ipstack.apikey=<API KEY FROM PROVIDER>
Poi, logout e un nuovo login. Per mostrare la geolocalizzazione IP cliccare sull’icona all’estrema destra della riga:

Impersonate login
Per impostazione predefinita, i login effettuati tramite impersonate (admin!<user>) non vengono visualizzati nella tabella dei log di accesso. Per aggiungere anche questo tipo di accesso, è necessario aggiungere la seguente chiave per il servizio core:
chiave=audit.logimpersonated
valore=true
Nuova notifica del dispositivo#
È possibile ricevere una e-mail che avvisa quando un nuovo dispositivo accede all’account per la prima volta.
Per impostazione predefinita, per evitare troppi falsi positivi non intenzionali sul primo login, questa funzione è disabilitata per tutti gli utenti.
È possibile personalizzare questa funzione accedendo al pannello di amministratore.
Nota
Per gli accessi effettuati tramite impersonate (admin!<user>) non verranno inviate notifiche via email
Limite massimo della dimensione del file#
Ci sono limiti predefiniti relativi alla dimensione massima del file:
Dimensione massima del file per gli upload di chat (impostazione predefinita interna = 10 MB)
Dimensione massima del singolo file allegato nel messaggio (impostazione predefinita interna = 10 MB)
Dimensione massima del file per caricamenti interni nel cloud (impostazione predefinita interna = 500 MB)
Dimensione massima del file per gli upload pubblici nel cloud (impostazione predefinita interna = 100 MB)
Per modificare questi valori predefiniti per tutti gli utenti, le seguenti chiavi possono essere aggiunte tramite l’interfaccia di amministrazione: Proprietà (sistema) `-> `Aggiungi. Il valore deve essere espresso in bytes. Esempio: 10MB = 10485760 bytes.
Dimensione massima del file per gli upload delle chat
Servizio:
com.sonicle.webtop.coreChiave:
im.upload.maxfilesize
Dimensione massima del singolo file allegato nel messaggio
Servizio:
com.sonicle.webtop.mailChiave:
attachment.maxfilesize
Dimensione massima del file per caricamenti interni sul cloud
Servizio:
com.sonicle.webtop.vfsChiave:
upload.private.maxfilesize
Dimensione massima del file per gli upload pubblici sul cloud
Servizio:
com.sonicle.webtop.vfsChiave:
upload.public.maxfilesize
Importa contatti e calendari#
WebTop supporta l’importazione di contatti e calendari da vari formati di file.
Contatti#
Formato di contatti supportati:
CSV - Comma Valori separati (*.txt, *.csv)
Excel (.*xls, *.xlsx)
VCard (*.vcf, *.vcard)
LDIF (*.ldif)
Per importare contatti:
cliccare a destra sulla rubrica, quindi selezionare Importare contatti
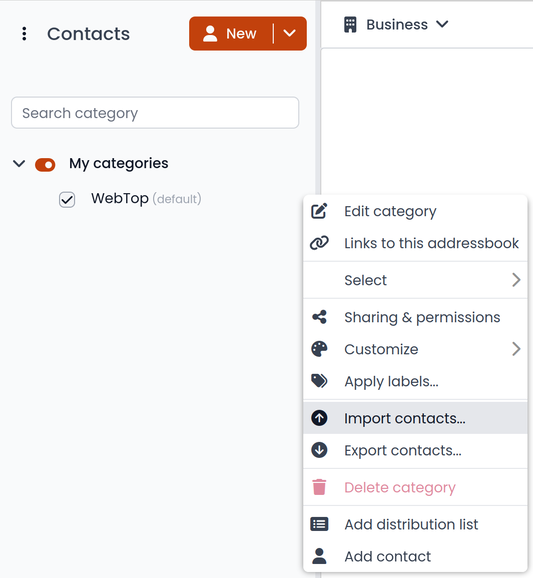
selezionare il formato di importazione e assicurarsi che i campi sul file corrispondono a quelli disponibili su WebTop

Se si sta importando una rubrica esportata da Outlook, assicurarsi di impostare Testo qualificante come " valore.

Calendari#
Formati di calendario supportati: iCalendar (*.ics, *.ical, *.icalendar)
Per importare eventi:
cliccare a destra sul calendario di destinazione, quindi selezionare Importa eventi

selezionare il formato di importazione

quindi scegliere se si desidera eliminare tutti gli eventi esistenti e importare nuovi, o semplicemente aggiungere i dati importati agli eventi di calendario esistenti

Personalizzazione della composizione email#
Nascondere il destinatario auto suggerito#
È possibile disabilitare il suggerimento degli indirizzi salvati automaticamente. Accedere al pannello di amministrazione web -> Proprietà (sistema) -> Aggiungi ->, selezionare com.sonicle.webtop.core (WebTop) e inserire i dati in Chiave e Valore secondo la chiave da configurare:
recipient.provider.auto.enabled = false (default is true)
Modificare oggetto di una mail e salvare#
Per consentire la modifica dell’oggetto sulle e-mail ricevute o inviate, accedere al pannello di amministrazione web -> Proprietà (sistema) -> Aggiungi -> selezionare com.sonicle.webtop.mail (Mail) e inserire i dati nel Chiave e :guilabel: Valore campi secondo la chiave da configurare:
``message.edit.subject``= true (default is false)
Eliminare gli indirizzi email suggeriti automaticamente#
Quando si compila il destinatario di una mail, vengono suggeriti alcuni indirizzi e-mail salvati automaticamente. Se è necessario eliminarne qualcuno errato, passare con i tasti freccia fino a selezionare quello che si desidera eliminare (senza fare clic su di esso), quindi cancellarlo con Shift + Canc
PECO Ponte#
Nota
Disponibile solo per Nethesis Enterprise
PEC (Posta Elettronica Certificata) è ampiamente utilizzato in Italia come sostituto virtuale per posta raccomandata, in quanto detiene la stessa validità legale.
PECO Bridge è una funzione WebTop che integra caselle di posta PEC esterne con WebTop.
Se il sistema ha un attivo Subscription sotto il piano Nethesis Enterprise, è possibile acquistare una licenza PEC Bridge attraverso la categoria NethService nel negozio online Nethesis.
Una volta completato l’acquisto, Nethesis fornirà istruzioni per attivare la licenza e configurare il ponte PEC.
Inside the Advanced settings of the WebTop administration panel, you can set the
PEC Bridge notify address to receive notifications when a new PEC event is received.
Customization#
It’s possible to customize the PEC Bridge behavior by setting the following environment variables:
PECBRIDGE_NOTIFY_OWNER: indicates which notifications to send to the PEC account owner.Possible values are:
all: all notifications sent to the PEC owner (this is the default if the variable is not set)auth: only authentication failure notifications are sent to the PEC ownernone: no notifications are sent to the PEC owner
All notifications will always be sent to the address configured in «PEC Bridge notify address», if configured.
PECBRIDGE_FROM_ADDRESS: the email address used as the sender of the PEC Bridge notifications
To configure these variables, access the WebTop server via SSH and execute the following commands:
runagent -m webtop1
echo PECBRIDGE_FROM_ADDRESS=no-reply@test.org >> environment
echo PECBRIDGE_NOTIFY_OWNER=auth >> environment
systemctl --user restart pecbridge
Replace webtop1 with the actual WebTop instance name.
Please note that the command above appends the variables to the environment file, use it only when customizing the environment variables for the first time. On next changes, edit the file directly using a text editor like nano or vi.
NethVoice phonebook integration#
Inside the WebTop application there is an automated workflow that allows to:
export WebTop contacts to the NethVoice centralized phonebook
import the NethVoice centralized phonebook to the WebTop contacts
The workflow is disabled by default, to enable it:
make sure at least one NethVoice instance is installed inside the cluster
in the
Settingspage, select the NethVoice instance from theSynchronize Phonebook with NethVoice instancefield inside theAdvancedsectionsave the settings
The synchronization occurs every night, ensuring that the NethVoice centralized phonebook is regularly updated in WebTop. This automated process helps maintain consistency and accuracy between the two systems, allowing users to access the most current contact information without manual intervention.
From WebTop to NethVoice#
To add contacts from any WebTop 5 user address book to the NethVoice centralized phonebook, simply share it with the system admin user named Admin (NethServer).
Users can voluntarily choose to share their contacts for import into the NethVoice phonebook. This operation must be performed individually by each user who wishes to share their contacts.
The user must follow these steps:
open the
Contactssectionunder the
My Categoriessection, choose an address book to share, then click on the kebab menu (three dots) and select theSharing and Permissionsmenu itema drawer will open on the right side of the screen, click the Add button
in the search field, type
adminand select the user from the list
Nota
The address book must be shared directly with the admin user. Sharing it with a group containing the admin user is not sufficient.
Ensure that only individual address books are shared and not the entire category, to prevent synchronization errors.
From NethVoice to WebTop#
When the synchronization is active, the NethVoice centralized phonebook is imported into WebTop 5 every night.
Contacts are imported into a newly created address book named Rubrica Centralizzata, within the administrator user account, named Builtin Administrator user. The username corresponds to the one used to provision the user domain associated with the mail server connected to WebTop 5.
To allow other groupware users to access the address book, access with the administrator user and share it with the desired users or groups as READ-ONLY. To share it with all users, select the Users group.
It’s possibile to override both the address book name and the user name by setting the following environment variables inside the phonebook.env file:
PHONEBOOK_WEBTOP_ADMINPHONEBOOK_WEBTOP_FOLDER
To do so, access the shell and enter the WebTop instance environment, replace webtop1 with the actual WebTop instance name:
runagent -m webtop1
echo "PHONEBOOK_WEBTOP_ADMIN=myuser" >> phonebook.env
echo "PHONEBOOK_WEBTOP_FOLDER=MyPhonebook" >> phonebook.env
On next synchronization, the address book will be created with the specified name and shared with the specified user.
Please note that the command above appends the variables to the phonebook.env file, use it only when customizing the environment variables for the first time. On next changes, edit the file directly using a text editor like nano or vi.
Sincronizzazione manuale#
To manually force synchronization and verify correct configuration, run the following command from the shell:
runagent -m webtop1 systemctl --user start phonebook
Replace webtop1 with the actual WebTop instance name.